Wednesday, July 3, 2013

A Knitted Treasure

I've always wanted to knit. I've tried to learn a few times since I was a teenager but it never stuck. But when my best friend Liz announced that she was having a baby I was determined this time I would master it. A quick Google search revealed a gorgeous hooded baby blanket that I fell in love with.  This was going to be my first knitting project. Jumping in the deep end knowing nothing about knitting patterns, needles and yarn weights there some confusion about what yarn to use. I couldn't get the blend used in the pattern so I ended up using 100% pure Australian Merino wool which was lovely to knit with and gave the finished blanket a nice softness.


The internet was invaluable, YouTube videos in particular. Both with knitting and crochet I have trouble figuring out what to do from diagrams so being able to watch someone going through the steps on a video was fantastic.

My edging is thicker than the one in the pattern. The body of my blanket didn't knit out to the required 60cm , so I made the difference up in the edging.

I love stockinette stitch, it looks so neat and pretty.

Joining the hood section with the main body of blanket using mattress stitch.

This project required me to learn how to knit, purl, and how to do stockinette stitch, slip slip knit (SSK), knit two together (K2Tog), pass slipped stitch over (PSSO), join two pieces of knitting together with mattress stitch, increase left and right and master broken rib with increases at each end. To do this I watched the same videos over and over and undertook many practice patches to get things right. I'm still a little shaky at undoing stitches so I didn't want to make any mistakes when it came time to knit the blanket.


My least favourite part of knitting is binding off which I do too tightly. So for this project I learnt how to do the lace bind off method which was quite easy, but still my least favourite part of the project. Not being happy with the look of my bind off and feeling that the blanket needed a little something extra I decided to bind the edges of the blanket in satin ribbon. This was done using the somewhat appropriately named blanket stitch.

Ribbon edging with blanket stitch. I'm happy with the result.
Left over threads and ribbon waiting for their next project.
My beautiful friends with the finished blanket.

Knitting this blanket has helped me rediscover my love of knitting and will no doubt be the first of many things I knit for Liz and her bub. I'd love to hear about your first knitting project, so please feel free to share!


Thursday, February 14, 2013

Stitches so far...


From the manner in which a woman draws her thread at every stitch of her needlework, any other woman can surmise her thoughts.  

~Honore de Balzac


Thanks in part to the industrial revolution and the rise of machines the age old skill of hand embroidery is dying. Girls and young women are rarely taught it and these days are rarely interested in learning it.  It is easier and cheaper to have the embroidery done by machine, which is some cases is understandable in today's day of mass production.

The tradition of beautiful hand embroidered heirlooms, whether they be christening smocks, samplers or tablecloths, being passed down through the generations is slowly fading away. Which is really sad and a loss to future generations. 

From the moment I saw my first piece of beautiful hand embroidery I knew that I wanted to master the art.   

So last year I bought a simple piece of calico, embroidery hoops and my first needles and DMC threads. A friend of mine had some fantastic embroidery manuals which I scanned and saved. And I sat down one day and started teaching myself to embroider.  

It's not as hard as you might think and more rewarding than you can imagine.  Watching the colourful stitches slowly form a picture is an addiction which not even repeated needle pricks to your fingers can cure.

Here is a list of stitches I've learnt so far...


  • Algerian Eye Stitch
  • Back Stitch
  • Back Stitch - Single Threaded
  • Blanket Stitch
  • Blanket Stitch Pinwheel
  • Bullion Knot (still needs some practice)
  • Chain Stitch
  • Chain Stitch - Whipped
  • Cross Stitch
  • Detached Chain
  • Fern Stitch
  • French Knot
  • Herringbone Stitch
  • Lazy Daisy Stitch
  • Lazy Daisy Stitch - Double
  • Long and Short Stitch (took me a little while to master)
  • Outline Stitch
  • Satin Stitch
  • Satin Stitch - Padded
  • Seed Stitch
  • Split Stitch
  • Stem Stitch
  • Stem Stitch - Whipped
These are mostly basic and easy to learn stitches but used in combination you can achieve some really pretty and complex results.  The only limit? Your imagination!

Here are some pics of my earliest pieces done when I was learning these stitches. 


(Stitches used in the above piece: Padded Satin, Long and Short, French Knots, Whipped Back Stitch, single Lazy Daisy Stitches)


(Stitches used in the above piece: Blanket, Algerian Eye, French Knot, Chain, Whipped Chain, Whipped Back Stitch, Satin, Lazy Daisy Double, Seed)


Space to be Crafty

You don't need a lot of space to get crafty!

Sure having a whole room to dedicate and unleash your creative passions is many crafters dream. I know some lucky women who are living the dream, a whole room dedicated to their craft of choice, with covet-able storage solutions, wanton excesses of work space. But for most of us having our own crafting room is just not an option short of kicking one of the kids out of their rooms or re appropriating the man cave amidst howls of protest.

Dedicated space to craft is even less of an option when you live on a boat!

Which is okay, because if you're creative enough to be crafty in the first place then you're creative enough to find ways around space restrictions. 

I've had to. There was no way I was going to leave my creative hobbies behind when I moved on board. My creativity is a large part of who I am, I need it, after a while of not being creative in some way I get depressed. But some concessions had to be made though.  I had to abandon a blossoming love of paper crafts, card making in particular.  There's no way of getting around the storage space required for paper slicers, stamps, stickers and oodles of pretty paper.  And I had to make hard choices when it came to my sewing box full of goodies, projects-in-progress and gorgeous fabrics. In the end only a fraction of my crafting gear came with me.  

But I'm surviving thanks mainly to embroidery.  

Embroidery, indeed all stitching crafts are great for space challenged crafters. A wide range of threads can be stored compactly, round hoops can be hung up out of the way or stored easily in small cupboards. Pins, needles, thimbles, scissors and most other accessories don't take up a lot of space either. 

My craft basket of works-in-progress

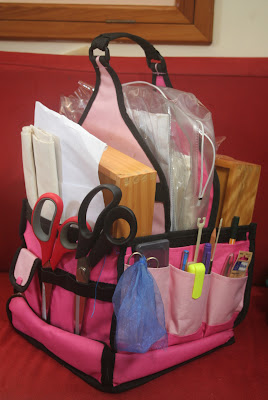
There are a lot of clever storage space options around the place these days too. I'd be lost without my pink craft caddy, a thoughtful Christmas gift from my sister-in-law. It stores most of what I need in one compact place which makes it easy to access what I want and also pack them away quickly when i'm done. Small baskets, tins, boxes and even Swedish bathroom accessories from IKEA have all proved invaluable in keeping my minimal crafting space organised.  

My very handy craft caddy

Do you craft? How do you keep organised? Have you got your own room or do you take over the dining room table for weeks on end?